
A Step by Step Guide
One of the features I like about the NetSuite SuiteCommerce web store is the related item functionality. Not only can you hand pick related items to display on product pages, but you can also allow NetSuite to automatically generate recommendations based on sales history. NetSuite includes four sample related item layouts, but they don’t handle varying sized images very well and tend to take up a lot of space, so I developed an alternative layout that solves some of those problems.
A Better Related Item Layout
Here’s what you can expect from the new layout:
Features
- Automatically centers the thumbnail horizontally and vertically.
- Uses your existing item thumbnails, no matter what size they are, and allows the browser to resize it with CSS. This saves you from having to manually standardize your thumbnail sizes, which can take a lot of time to maintain.
- This solution does not depend on the NetSuite image resizing tool, which can be problematic.
- Fully search engine friendly solution, by including the item name in the link, it boosts your internal link credit for those keywords.
- Get the benefit of using CSS to position and resize the images, while preserving the NetSuite preference for table-based layout.
Step-by-Step Guide to Creating the Layout
Prerequisites: you should be familiar with the NetSuite templating system, and have a NetSuite SuiteCommerce web store that uses the built-in related items functionality. you can also click to download a zip file containing all of the code here.
- First, create the list template. Go to Setup > Site Builder > Item/Category Templates > New. Copy & paste this code into the ‘Template HTML’ field. Name it something like ‘FWC related item list template’ and hit save:
<!– start FWC related item list template –>
<td id="itemlisttd"><table cellpadding="0" cellspacing="0" class="list">
<tr>
<NLITEMLIST>
</tr>
</table></td>
<!–end FWC related item list template –> - Create the item list cell template. Go to Setup > Site Builder > Item/Category Templates > New. Copy & paste this code into the ‘Template HTML’ field. Name it something like ‘FWC related item list cell template’ and hit save:
<!– start FWC related item list cell template –>
<td class="itemcelltd <%=getCurrentAttribute(‘item’,’internalid’)%>" valign="top">
<div class=’cel big_related_link’><div class="imgWrap"><A href='<%=getCurrentAttribute(‘item’,’storeurl’)%>’ title='<%=getCurrentAttribute(‘item’,’storedisplayname’)%>’><img src='<%=getCurrentAttribute(‘item’,’storedisplaythumbnail’)%>’ border=’0′> </div>
<%=getCurrentAttribute(‘item’,’storedisplayname’)%></a>
</div>
</td>
<!–end FWC related item list cell template –> - Create your layout. Go to Setup > Site Builder > Layouts > New. Name it something like: ‘FWC related items layout’. Fill out the fields as follows:
- Border style: No Window
- Column Width: Fit to browser window
- Number of columns: whatever you like, up to 6
- Number of rows: 1
- row height and row padding – leave empty
- Paginate and sort links – leave unchecked
- Items are laid out: horizontally
- Use checkerboard effect: unchecked
- Sort by: sequence
- Use templates: checked
- List template: choose the template created in step 1
- List cell template: choose the template created in step 2
- Update your product template. modify your existing item drill down template with the following code to display the related items. If you give the template a new name and click save as, it will create a copy that doesn’t overwrite your default template. You can then use the new template to test before rolling it out for the full site. Here is the HTML:
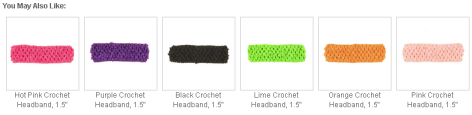
<div class="related_outer_wrap"> <strong>You May Also Like:</strong>
<table cellspacing="0" cellpadding="0" id="related_list">
<tr> <%=getCurrentAttribute(‘item’,’allrelateditemshtml’)%> </tr>
</table>
</div> - Add the CSS code to your main file. Websites tend to vary, but most have a single CSS file that contains most of the CSS code for the site. Add this CSS code to the end of the main CSS file, then upload it to your file cabinet, replacing the existing one. Here is the CSS code (or click here to download it as a text file):
#itemlisttd { padding: 0; }
.itemcelltd {
text-align: center;
padding: 0 5px 15px 5px;
margin: 0 auto;
width: 120px;
}
div.imgWrap {
float: left;
text-align: center;
width: 120px;
height: 121px;
margin: 0px;
border: 1px solid #ccc;
font-size: 1em;
line-height: 148px;
}
div.imgWrap img {
margin-top: expression(( 100 – this.height ) / 2);
max-width: 120px;
max-height: 120px;
position: relative;
top: -15px;
}
html>body div.imgWrap img { /*hidden from IE 5-6 */
margin-top: 0; /* to clean up, just in case IE later supports valign! */
vertical-align: middle;
}
.related_outer_wrap {
padding-top: 50px; clear: left;
}
#related_list {
margin-top:10px;
} - Test your new layout. In NetSuite, navigate to a category or tab that contains items, and edit it. change the’ Related Items List Layout’ to the one created in step 3. This will override the default for this category only. To change the default, update the selection in the site theme or set up website, depending on how your site is configured.
See it in Action
Here are a couple of working examples:
If you didn’t already know, you can get a free test drive account from NetSuite filled with sample data that you can use to test out all kinds of things. I highly recommend it for anyone who wants to learn NetSuite. Here is a handy guide to setting up your NetSuite test drive account.
Best Practices
- Always use HTML comments at the beginning and end of your templates, this will make troubleshooting your HTML code on the website much easier.
I have done this in my example, with a comment indicating the start and end of each template. - Use Google Analytics or other web analytics to determine what browsers and platforms are important for your website, and make sure to test any site changes in those browsers before going live.
- Use a test environment to evaluate changes to the site before they get pushed to all users. Here’s a guide to NetSuite test environments I wrote explaining various ways to do this.
- Put CSS code into your main CSS file for your website, not in the ‘add to <head>’ section under the list or cell template. There is a bug with NetSuite that prevents code entered in that field (in certain templates) from actually showing up on the website, and it is better to centralize your CSS anyway.
More from Fourth Wave
 5 Minute Guide to Creating a 404 Report in NetSuite
 NetSuite Global Search Tips
 BatchIt (Reconcile Amazon Batch Payments With Ease)
 Netsuite 2020.2 Update: Data-center URL deprecation + What You Need To Know
 Site Builder Performance Upgrades
 NetSuite Announces Plans to End Promotion Functionality for Site Builder
David Norris
Latest posts by David Norris (see all)
- NetSuite Announces Plans to End Promotion Functionality for Site Builder - January 16, 2020
- Most NetSuite Websites Are No Longer Tracking Safari Conversions for Adwords - November 20, 2017
- Make Your NetSuite Site Builder Site Secure – HTTPS Throughout - May 28, 2017
- An Introduction to Automating XML Sitemaps for NetSuite Companies - November 13, 2016
- An Introduction to NetSuite’s Reference Checkout & My Account Bundles - April 18, 2016